

***This is a quick look at some of our awesome Tahoe mountain bike trails, specifically along the Tahoe Rim Trail. Check back later for a more complete list***
Living in Tahoe makes us a bit jaded and spoiled. Yes, our mountain bike trails in the basin are covered in snow for 6+ months out of the year. But, we can be off the hill in a few minutes and find riding any month of the year. But, why would we want to leave skiing and snowboarding to ride our bikes? Well, sometimes we all get tired of a good thing. That’s also why we venture well beyond Tahoe. Plus, all those travels makes us appreciate home all that much more.
The North Shore
The north side of Lake Tahoe is comprised of the area around Donner Pass, over to Mt. Rose Wilderness, through Truckee, to Tahoe City on the west and Incline Village to the east. This was where I first discovered the magic of Lake Tahoe.
My first journey to Lake Tahoe took me to Squaw Valley, USA on a college break ski retreat. We stayed down in Reno and rode the ski bus up to the slopes every day. During that drive, I scanned many of the ridgelines, meadows, canyons, etc. and wondered what those trails must be like, once the snow melted. It would be almost 10 years later before I discovered what lay beneath all of that snow.
Hole In The Ground

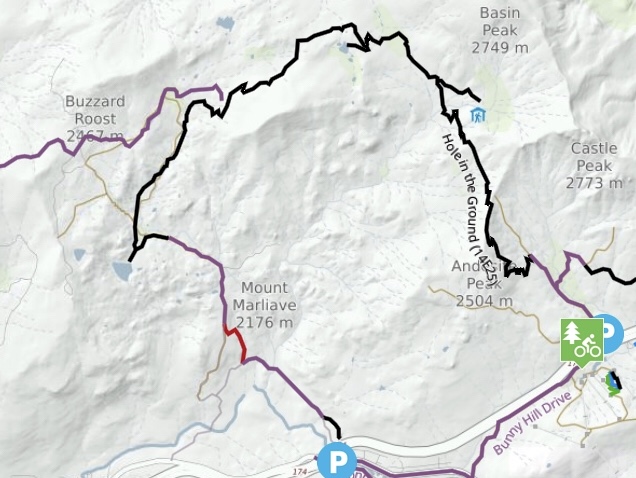

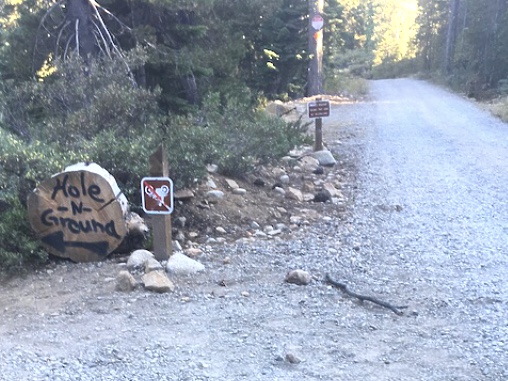

This is a popular ride that cuts to the north side of I-80, then comes back along the edge of Sugar Bowl and Boreal Resorts. The entire loop is 13+ miles of up and down with a mix of singletrack, fire roads, Hwy 40, and doubletrack. The views are incredible. But, the up and down nature of the ride can be a heartbreaker. Heartbreaker may not exactly be the correct term for me. Lung buster may be a bit more appropriate. Little did I know, but I was experiencing deep vein thrombosis coupled with a bi-lateral pulmonary embolism when I first rode Hole In The Ground.
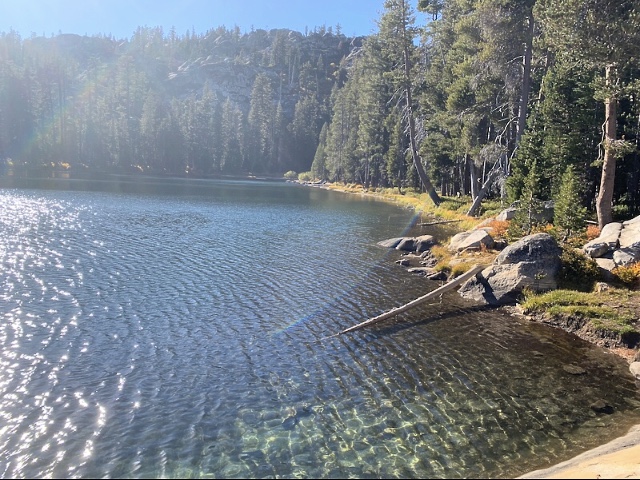
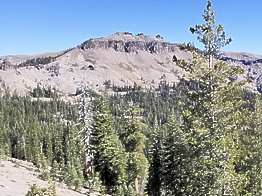
As the ride left the Boreal parking area to cross I-80, I felt my lungs working a bit harder than before. But, we pushed forward and continued to climb. After crossing under the I-80 bridge, the ride joins the same trail that would take you out towards the Peter Grubb Hut in the winter. The scenery is pretty awe inspiring and a great motivator. The 1 mile climb has views of Castle Peak to the north. Eventually, the ride hits the peak of the ridgeline near Andesite Peak and starts it’s first section of flowing singletrack. But, it isn’t long before the next gradual climb. About halfway through this section is a side trail off to the Sand Ridge Lake. I’m always a big fan of cooling off when working hard. And, this ride had me working pretty hard. If you decide to ditch this lake, there’s another towards the end of this section. It’ll be before you continue along the edge of the neighborhood and Lower Lola Montez Lake.
Before long, the ride takes you back towards I-80 and across to Donner Pass Rd. Keep a close lookout for traffic because there really isn’t much room for error. Eventually, there’s a detour towards Bunny Hill Drive that parallels I-80 and avoids the dangers along Donner Pass Rd.
This ride is a pretty sweet loop, even if you are suffering from a PE. Yes, I definitely bitched and moaned. But, I didn’t quit and finished without a hitch. Honestly, this ride made me a bit more aware about listening to my body and knowing my limits. But, it never stopped me from enjoying the ability to ride my mountain bike.
Sawtooth Ridge

What better way to get warmed up for a Teton Gravity Research mountain bike movie premiere than to hit the trail on your bike? When TGR presented their movie Unreal, we headed over to Truckee to hit some north shore trails beforehand. Knowing we would be a bit pressed for time, we decided to keep it close to the venue. Thankfully, Truckee has it’s fair share of trails to ride.
Truckee River Regional Park has a couple great riding areas within close proximity. We could hit the bike park at Northstar, if it was open. We could head up to the Tahoe Rim Trail, if we had more time. Or, we could head down the road to the base of Sawtooth Ridge for a sweet loop with options for shortening the ride, if need be. In fact, there are close to 30 different trails in the area to choose from. Well, Sawtooth Ridge was the clear winner.
I’d never been to the area. So, I needed to check some mileage and parking areas. Thankfully, we had a well detailed Adventure Maps of the area. Plus, we were able to look at our GPS apps for more detail. We decided to park near the Ponderosa Palisades neighborhood and catch Sawtooth Rd. (FR 06) up towards Sawtooth Ridge. It’s a pretty mellow fire road climb with at least three options to bail out early. The trails are setup in a figure 8 pattern with the road up slicing it right down the middle. This is a great zone for those that can’t decide between an epic day and a quick shuttle.
The views start to appear as the road climbs higher and higher. Off to the west, you’re looking down over the Truckee River. Off in the distance is Squaw Valley and another fun zone near a trail called Yogi’s. But, this ride is focused over here. Keep climbing and keep finding more and more options. This zone has you covered, whether you want your ride long or short. We needed to cut this ride short to catch the movies. So, we looped down via the fast, fun, flowy, rocky, Sawtooth trail. Just be sure to keep your eyes on the trail and not the views. It’s easy to get distracted with the views overlooking Hwy 89, the Truckee River, and the views to the west.
There’s been a bit of improvement recently in this area. The Big Chief trail has just gotten a little bit of love from the Truckee Trails Foundation. And, I can’t wait to check out the work in person. The Truckee Trails Foundation has worked hard with the USFS and Northstar to make the Sawtooth and Tahoe Rim Trail connector a reality. It’s always good to see Tahoe mountain biking get some fresh legs. We are a Mecca for so many riders from near and far.
Painted Rock


The route to Painted Rock can start in a multitude of places. Personally, I like to get a warmup before heading full bore into a climb. We decided to park our truck near the golf course and Tahoe Lake Elementary School. There was roadside parking available. So, we could start here and warmup our legs heading towards Dollar Point along the bike path. I’ve also heard of people catching the bus at the transit center for a “shuttle” approach. I’m not always that smart. Besides, it’s good to get the legs cranking with a warmup ride before tackling the dirt.
We cruised along the bike path until we got to Dollar Point, near the 7-11. At that point, we got off the pavement and headed alongside the Dollar Resevoir. There’s a pretty cool damn crossing, but don’t let the mellow trail fool you. It’s time to start climbing and head up to the Tahoe Rim Trail. We definitely made a wrong turn here. Soon, we were hike-a-biking almost straight up the mountain. But, it actually turned out well. We made the climb a more direct and less grueling ride, if you consider bushwhack hiking a 40lb bike up a mountain less grueling.
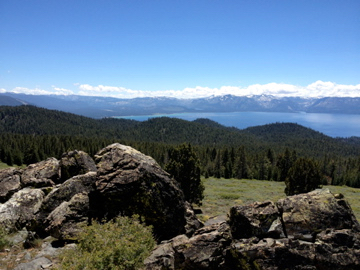
This is where the trail really shines. As you ride along the TRT (Tahoe Rim Trail), you’re rewarded with amazing views of Lake Tahoe to the south. There’s a mix of doubletrack and singletrack that follows the rim of the Lake Tahoe basin. Eventually, you come to Painted Rock. From here is where the fun starts.
Rides are meant to have good downhills and this ride delivers. After all of the bushwhacking, hike-a-bike section, and climbing, it felt great to stop pedaling and point the bike downhill. The view can be a bit distracting. But, soon you’re back in the trees and deeply focused on the trail.
Eventually, the Glass Mountain Trail takes you all the way into Tahoe City. There has been a recent reroute, so pay attention to which trail you’re following. Older, printed, maps may lead you to the decommissioned trail. This may be a good time to rely on MTB Project, Trailforks, or another GPS application to help you along the way.
We came off the trail back near the golf course and the First Baptist Church Of Tahoe City. Who knows, maybe you’ll be as lucky as we were to finish your ride with a wedding crashers moment like we had? I hope they’re a happy couple. I can’t remember their names. But, I definitely remember the cold beer they offered. That was a great way to help us at the end of our adventurous ride.
The West Shore
There’s a saying that says, “The West Shore is the best shore”. Well, that can seem a bit biased. But, the west shore has a little bit of everything and a little something for everyone. I consider the west shore to encompass the area north of Mt. Tallac up to Tahoe City, along beautiful Hwy 89. A lot of this area is composed of the Pacific Crest Trail and Desolation Wilderness, which are no ride zones. I wish there was a way to legally ride these areas. But, I do understand the logic of restricting the usage, as well as the benefit of multi-use trails. Thankfully, there are still some great options that don’t require anyone to bend the rules.
Stanford Rock


Well, I don’t think a lot of people will forget my ride up Stanford Rock. It may have been one of my most commented photos. I took a cue from many of the “liberating” summit photos that ladies like to post. Between the heat of the day and the exhaustion from the climb, I decided to strip down and and take in nature’s majesty in nothing more than what God gave me. Well, I may have still had my shoes on. But, that view was obscured by a downed log.
The trail for Stanford Rock is a nice option for those looking for a loop ride with a view. I’m always a big fan of loops versus out and backs or one way shuttles. To me, that’s part of the mystique of mountain biking. We should be able to head out, adventure, and loop back to where we started. Well, some people like to do a lollipop style loop for Stanford Rock. But, I don’t think the road warrants the extra addition. It’s neither fun for the climb or exciting for the downhill. So, I started our ride just across Ward Creek at a parking area alongside Ward Creek Blvd. This ride can also start lower down near lake level at Ward Creek State Park off Hwy 89. That would be the lollipop starting place.
The first part of the ride takes you across Ward Creek and immediately into a climb. Be prepared. This is a long and arduous climb. It’s about 5.5 miles of steady, continuous, climbing. Now, you may understand why I stripped down to my birthday suit. But, the view from the top makes it all worthwhile...that’s the view of the lake.
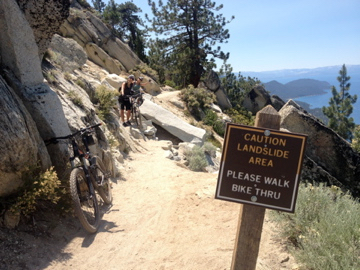
From the top, the trail drops down into a rocky, technical, descent with a section of almost never ending stairs. Tamba (Tahoe Area Mountain Bike Association) has been doing a lot of trailwork over here. So, be respectful and appreciative. This area might also be an area where you really appreciate a well-stocked tool, repair, snack, and hydration kit. There’s a lot of rocks, as well as a lot of trail left for the ride. The trail is far from over when you get to the bottom of the stairs. You still have to get back to the car.
Follow the doubletrack fire road which is the TRT/Ward Creek Rd. That trail shadows Courchavel Rd/Ward Creek Blvd. and Ward Creek with the trail sandwiched in between. Continue with that section until you come to a gate. At that point, get on Ward Creek Blvd. and blast down the main road back to the truck.
There are a multitude of ride options all along the west shore. But, remember that bikes are not allowed to be ridden along the PCT (Pacific Crest Trail) or are they permitted in wilderness areas. But, the ability to connect to other sections via the TRT almost make a TRT loop connection possible. Too bad that we have to get back on Hwy 89 or head over the Rubicon Trail to connect with our South Shore trails. So, let’s see what the trails are like to the south.
The South Shore
The South Shore is our home base and home to some of my favorite zones in the world. I consider the South Shore from the flanks of Mt. Tallac over to Lover’s Leap, across to Kirkwood, and around to Kingsbury Grade. Once you pass Kingsbury, then I’d say you’re headed into Tahoe’s East Shore. That will be the last section I cover regarding Tahoe mountain biking.
I love being able to connect with the trails right outside my yard. And, I love the camaraderie, support, and challenges available for those that are willing to tackle the adventures. We have the Meyers Mountain Bike Festival, Rose To Toads, Kirkwood Bikes & Brews, and many more events showcasing our local mountain bike scene. We also have some of the best local bike shops. We even have mobile bike repair options. And, TAMBA has done so much to help our mountain biking develop into one of the best mountain biking areas in the world with trail work, signage, and so much more. So, what are some of the South Shore’s most popular rides?
The Pony Express


There aren’t many place that you can ride the same trails that Pony Express riders took back when the west was young. I always imagine the long days in the saddle and time it took for these pioneers to basically deliver the mail. Today, we’re able to ride our steel/aluminum/carbon fiber “horses” along many of the same trails that the Pony Express riders rode back in the day. Thankfully, our packs aren’t loaded up with lots of mail.
The Pony Express or XP, as many trail markers refer to it, is a great ride that heads from Meyers over to Strawberry and beyond. The riders would come up from the Carson Valley, through what eventually became Hwy 88, and continue all the way to Sacramento along what is now Hwy 50. Personally, I like to start at the top of Echo Summit and end in Strawberry. But, that’s not how I took my girlfriend on the Pony Express. I made her earn it with an out and back. That’s one way you appreciate exactly what those Pony Express riders endured.
Starting at the end of South Upoer Truckee Rd., it’s an immediate climb up Hawley Grade. One of the benefits is passing one of Tahoe’s hidden gems, the waterfall along Hawley Grade. In the spring, this can be quite the obstacle. But, once Summer is underway, it’s actually quite manageable. Just don’t slip, otherwise it’ll be a long way tumbling down the rocks.
Once up on Echo Summit, you continue along the trail next to Lake Audrain and eventually over through the Sierra At Tahoe Resort. This is an up and down adventure, as you cross over peaks and valleys, including Huckleberry Canyon. As you cross under the West Bowl Express chairlift, you’re rewarded with an amazing view of Pyramid Peak, which lies across the highway and in Desolation Wilderness. This would be a great spot to recharge the tanks before tackling the upcoming hike-a-bike section ahead. But, there’s still plenty of singletrack before getting to that section on the flanks of Lover’s Leap.
I’m not sure that I’ve ever seen anyone clear the last section of rocks near the top of Lover’s Leap. But, you never know. There’s probably someone out there that was able to power up that challenging outcropping. As for me, I shouldered the bike and carried it up. But, I made sure to finish the last little bit by riding over to the summit.
Once you’re standing atop Lover’s Leap, there are a couple options. You can choose to continue west and drop down into Strawberry. Or, you can turn east and retrace the ride back to Echo Summit. I’ll drop into Strawberry, only if I’ve arranged a shuttle. But, doing the out and back is a great ride with the opportunity to feel how the trail flows. Plus, you get to tackle the hike-a-bike section going downhill like a boss.
All in all this trail actually has quite a few variations. There are side trips that make the ride more adventurous. There are shuttle options. And, there’s even an amazing swimming hole to really cap the ride in style. Don’t expect many services along the trail. It’s pretty isolated between Meyers and Strawberry. But, there are plenty of opportunities to refuel at either end of the trail.
Star Lake


Star Lake is a magical ride and is definitely one of the best rides on the South Shore. One of the best parts of Star Lake is that there really is no easy way to get there. It doesn’t matter if you start from the east, the west, or head straight up from High Meadow. It’s a climb, any way you look at it. But, I’d say it’s worth it. You can judge for yourself.
My first time up to Star Lake started at the top of Fountain Place Rd. I thought that we were saving ourselves a lot of effort and climbing by shuttling up the road. Little did I know that those extra miles of climbing would save me enough energy to add a side trip to the ride.
Starting at the top of Fountain Place Rd. saves you the energy expenditure from climbing the lower part of Corral and Armstrong. But, don’t worry, there’s still plenty of climbing ahead. It’ll be almost 4 miles to the top of Armstrong. Lots of the climb has some sandy sections and it’s a long way down if you slip off the trail. Once at the top of Armstrong Pass, it’ll be another 5 miles of trail with 1300’ of climbing and a 900’ drop down to Star Lake. Take time to appreciate some of the crystal outcropings on your way down to Star Lake. I actually was foolish enough to put a large crystal in my pack and bring it home for the family.
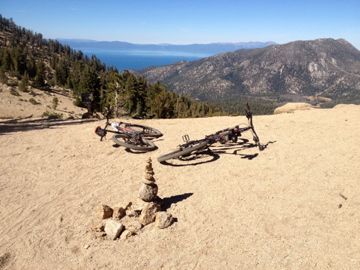
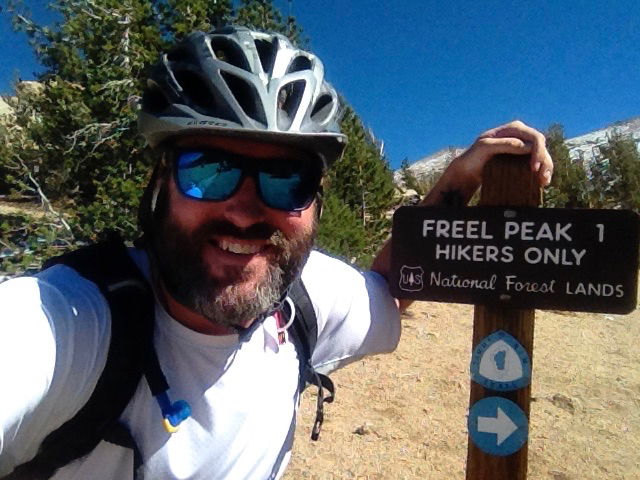
We’ve had a couple fun experiences on this section of trail. First, we added a side trip up to the summit of Freel Peak. Freel is the tallest peak in the Lake Tahoe Basin at 10,881’ above sea level. But, the most memorable ride was actually when a member of our group busted his derailleur. We decided to do a Toads To Rose variant during the annual Rose To Toads. Unfortunately, we couldn’t modify his bike to make it a single speed, since his rear shock wouldn’t lock out. Thankfully, we had already crested Freel Saddle. And, it was a mostly downhill ride back to town. So, we rode down pumping the turns and taking it easy on the brakes. That way, we were able to make it from the too of Freel Pass all the way to the bottom without needing to pedal.
Star Lake is situated so that there’s still a LOT of fun trail to ride in any direction. At Star Lake, you can continue east towards Monument Pass and eventually Kingsbury. Or, you can drop down towards Cold Creek. First, you might want to rest up and enjoy one of Lake Tahoe’s best alpine lakes. Time for lunch and a well deserved break before continuing on.
The drop down towards Cold Creek, along Star Lake Trail, is a definite highlight. It’s 3.5 miles with a 1300’ drop. And, it’s worth every bit of the effort. But, the Star Lake Trail is only a taste of what the downhill has in store. There’s a quick break in the trail at High Meadow. But, the most technically challenging part of the downhill is coming up.
After about a mile of Star Lake Rd. & High Meadow Rd., you cross a stream and get to the top of Cold Creek. Cold Creek is where you get to test some of your skills on granite. There are boulders, slabs, stairs, and other technical features to test your skills. Eventually, the ride loses the rocks and becomes a singletrack, two-way, trail with lots of high speed potential. Just pay attention for the riders climbing Cold Creek, as well as hikers near the bridge.
It is possible to connect back to Armstrong and make this a loop. But, most will choose to finish this ride with cars at both sides. My guess is that this ride will either be a favorite or a one and done. Whichever way you feel, you should definitely appreciate what a great accomplishment it is to make it to Star Lake.
The East Shore
The Bench Ride


How many mountain bike rides have one of the #worldsmostbeautifulbenches waiting for you at the summit? How many of those rides have a panoramic view with Lake Tahoe as the main attraction? More importantly, how many of those rides take full advantage of the Tahoe Rim Trail with multiple distinct rides all reaching the same summit and bench. The Kingsbury to Spooner section of the Tahoe Rim Trail is better known as The Bench Ride. And, this ride should be on every Tahoe mountain biker’s bucket list.
I wish I could tell you which way is my favorite to get to the bench. I’ve done an out and back epic ride. I’ve started and finished at both sides. I’ve used the Genoa Peak Rd. for the climb. And, I’ve dropped down into Genoa for a new variant. Now, TAMBA has even helped add more options with the renovation of the Stinger Trail. For this description, I’m going to cover the way I first tackled the trail. My first time riding this trail I started at Spooner and ended at Kingsbury. This is still one of my favorite ways to ride this trail.
It may not be obvious, but you will definitely need two vehicles to make this ride a reality. One vehicle will be waiting for you at the end of Andria Drive atop Kingsbury Grade. And, your other vehicle will take you to the Spooner Summit trailhead off Highway 50. Even with the higher elevation starting and ending points, expect to tackle about 3000’ of climbing and descending over the next 13 miles. Almost any way that you approach this ride is guaranteed with a climb. But, you’ll see that the reward is worth every bit of effort.
Starting out at Spooner puts you on a dirt, singletrack heading right into a climb. The trees mask the view of Lake Tahoe below. But, every once in awhile you get a teaser glimpse of the lake below. Another tease is the Genoa Peak 4x4 road that you’ll cross as you climb up the mountain. Yes, this could really be an easier shuttle. But, what fun would that be?
As for the terrain, this side doesn’t have the prominent rocks and granite like the other side does. This section is composed of smaller pine trees and beautiful meadows. Plus, this trail is mostly well tracked dirt. This may be Tahoe’s finest example of stereotypical singletrack. Remember that you’re following a section of the 165 mile Tahoe Rim Trail (https://tahoerimtrail.org/). And, this is a reminder that the geology of Lake Tahoe varies from north to south and east to west.
As you near the summit, the views open up and the trail begins to change. That well packed dirt is soon replaced by loose rocks and talus. You’ve now been climbing for close to 5 miles. And, I’m sure that the legs could use a break. Keep pushing forward, because your reward is waiting for you just off the trail to the right. Keep you eyes peeled on each of the rocky outcropings for the famed bench. Don’t worry. You’re almost there.
It’s actually not difficult to find the bench. The ride opens up with expansive views of Lake Tahoe. The wide open views reveal Monument Peak and Heavenly right in front of you. The views west peek into Emerald Bay and the backdrop of Desolation Wilderness behind. And, looking north it’s possible to view all the way to Squaw Valley USA. Time to sit down, recharge with a snack, and get refueled before continuing towards Kingsbury. The bench is the perfect setting and an ideal place to reenergize. In fact, you’ve reached the halfway point when you sit down and take in Lake Tahoe’s beauty all around you. Don’t forget to look in all directions. You just may be fortunate enough to see a paraglider high above or behind you.
Now, is when that Lake Tahoe geology starts to change. You’re fresh and recharged and ready to get that downhill ride going. As you cross the loose talus, eventually you dip down and the views get shrouded by the trees. Remember that this is a two-way trail as you get going faster and faster. It’s pretty easy to come up on a hiker, equestrian, or another biker as you zig and zag across the mountain. Save some legs, because it’s not entirely downhill.
The closer you get to Kingsbury, the more prevalent the granite becomes. There are a few sections where you’ll need to carry momentum and step up the rocky features. There are other areas where you’ll want to pick a solid line to navigate down the rocks. There will be a few trail crossings, but continue straight. Genoa Peak Rd. and the Stinger Trail can be saved for another adventure.
After close to 6 miles, you’ll come to a brief climb up to another intersection. This is where you’ll need to take the TRT Connector: Kingsbury North to get to the parking area. You’re close, but it’s still another half mile over to the parking area. Don’t quit now.
Overall, this ride highlights some of Lake Tahoe’s geology, the amazing views, and the seclusion that’s possible up on the Tahoe Rim Trail. Remember that much of this would not be possible without the support of the Tahoe Rim Trail Association, TAMBA, and others that help keep Lake Tahoe’s trails clean, safe, well maintained, and most importantly - open to mountain bikers.
The Flume Trail

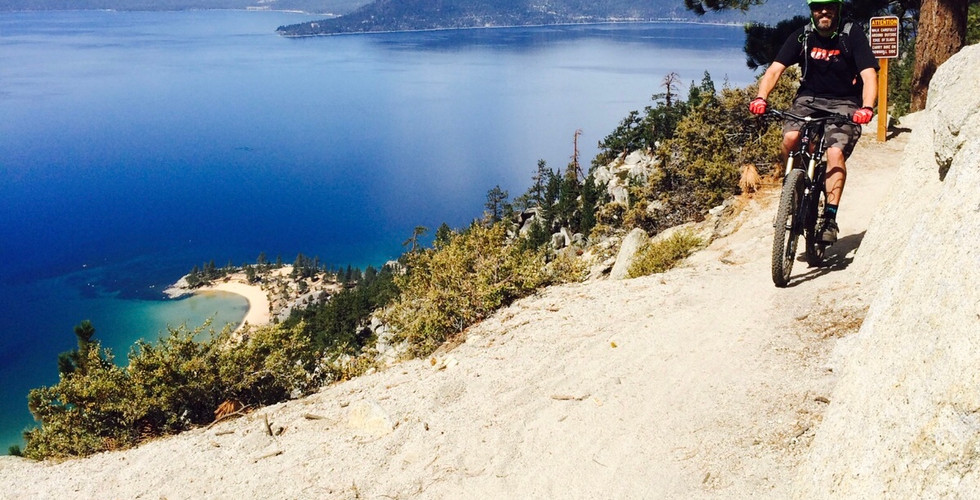


If someone is looking for a high sierra, picturesque, ride that embodies the essence of Lake Tahoe, then The Flume Trail may be exactly what they’re looking for. Technically, there’s not too much standing in the way. And, the ride isn’t too strenuous. But, the rewarding view and history of the area is enough to make the Comstock Lode look pee wee in comparison.
Accessing The Flume Trail can be managed by a couple different routes. Unfortunately, these routes also have certain restrictions. With popularity often comes regulation. The Flume Trail is no different. In order to accommodate hikers, bikers, equestrians, and other users, some of this area has adopted an even/odd day use restriction. Honestly, I forget the rules so many times. But, I try to share the trail and be courteous and respectful to any others that I encounter, whether I’m on the even day or odd day. The rule for the TRT section is EVEN days for bikers, and ODD days for equestrians.
My first time on The Flume began at the Spooner Summit. We arranged for a shuttle through https://flumetrailtahoe.com/. They would meet us at the bottom of the Tunnel Creek trail when we finished our ride. We just had to make our way there from our starting point at Spooner first. This meant we would be climbing North Canyon Rd. to Marlette Lake. I wouldn’t call this climb extremely difficult. But, I definitely had to work to get through it. Plus, we had to wait for a local black bear to finish his meandering stroll before we made it up to Marlette Lake.
Marlette is a welcome sight after the doubletrack climb. At this point, you’re definitely feeling the climb. Thankfully, the hardest part is behind you. Now, it’s a quick ride along the shores of Marlette Lake over to the Flume Trail.
Those that are afraid of heights may not enjoy the exposure of The Flume Trail. There’s even a great story about the history of the Flume. The Flume was the way that the Sierra Nevada Wood & Lumber Company tranported their timber down the mountain. All this timber had to make it’s way to Virginia City for the Comstock Lode. And, the Flume took advantage of gravity to accomplish the task easier. Let’s just say that the original V flume was inadventantly one of Tahoe’s original thrill rides. Be respectful of the dangers associated with the exposure. I’ve actually seen a boyfriend and girlfriend experience one of their bikes go over the edge and trying to call their rental company for a replacement while still on the trail. Please don’t be these people. The elevation change is minimal along the trail. In fact, most of the trail follows the contour line near 7700’ with a few little ups and downs. But, there’s not a drastic climb or descent until you get to the Tunnel Creek section.
Tunnel Creek is where you better check those brakes and get ready for the 1200’ downhill ride. It can be a soft and sandy ride. Plus, there are a couple “jogs” in the trail that will keep you on your toes. Consider this a bonus after the excitement and views along The Flume Trail.
This area was once the location for the classic television western, Bonanza. So, if things look familiar, then you may understand why. Nowadays, the end of Tunnel Creek isn’t the Ponderosa Ranch. But, now it’s home to Flume Trail Bikes. They’re able to provide shuttles, rentals, and even trail information. Good trail information can be priceless, especially during the Tahoe shoulder season when trail conditions can be quite variable. Remember that it can snow any month of the year in Tahoe. And, there’s quite a bit of elevation difference between lake level and along the Tahoe Rim Trail. Don’t let misinformation or machismo ruin a great Tahoe adventure.
The Tahoe Rim Trail

As you may have noticed, many of these mountain bike rides follow the path of the Tahoe Rim Trail. We’re fortunate enough to have a mixed use trail system that exists with the cooperation of the USFS, LTBMU, TRPA, TRTA, TAMBA, Truckee Trails Foundation & many other groups. If it wasn’t for these groups, then Tahoe may not be the mountain niking Mecca that we know today.
Tahoe mountain biking is making great strides. I’m happy to call this Mecca home. I still remember taking my Cannondale Super V 1000 down many of the trails back in the day. Some of those trails were little more than a glorified game trail when I first came to Tahoe. Now, I feel very fortunate to tackle these well built and properly maintained trails on my modern geometry Giant Reign with 160mm of full suspension travel. I look forward to seeing how Tahoe mountain biking evolves in my children’s lifetime. If it keeps pace, then we’ll be in for quite an adventure. As this season winds down, my mind races with thoughts of trails that are still on my bucket list, as well as trails I’ve known for years that are recently getting upgraded. Thank you to all of those that help make our mountain biking dreams a reality.
* South Shore Bikes - http://southshorebikeandsnow.com
* Watta Bike - https://wattabike.com
* In Motion PBS - https://www.inmotionpbs.com
* Shoreline Of Tahoe - http://shorelineoftahoe.com
* Tahoe Sports LTD - https://www.tahoesportsltd.com
* Sierra Ski & Cycle Works - https://sierraskiandcycleworks.com
* Blue Zone Sports - http://bluezonesports.com
* Over The Edge Bikes & Coffee - https://otesports.com/locations/south-lake-tahoe/
* The Backcountry - https://thebackcountry.net
* Start Haus Ski & Bike - https://starthaus.com
* Olympic Bike Shop - https://olympicbikeshop.com
* Paco’s Bike & Ski - https://www.pacosxc.com
* Flume Trail Bikes - https://flumetrailtahoe.com
Comentários